腾讯云物联网设备端 C-SDK
腾讯云物联网设备端 C-SDK 依靠安全且性能强大的数据通道,为物联网领域开发人员提供设备端快速接入云端,并和云端进行双向通信的能力。
本SDK仅适用于物联网通信平台IoT Hub,对于物联网开发平台,请访问 IoT Explorer C-SDK
一、SDK 目录结构简介
| 名称 | 说明 |
|---|---|
| CMakeLists.txt | cmake编译描述文件 |
| cmake_build.sh | Linux下使用cmake的编译脚本 |
| docs | 文档目录 |
| 3rd | 第三方软件包组件,如mbedtls |
| config | SDK功能配置以及编译工具链配置 |
| include | 提供给用户使用的外部头文件 |
| platform | 平台相关的源码文件,目前提供了针对不同OS(Linux/Windows/FreeRTOS/nonOS),TLS(mbedtls)以及AT模组下的实现 |
| common | SDK通用组件库 |
| services | SDK提供的服务源码,以模块独立存在 |
config/settings可选择相应的配置脚本,以根据需要裁剪SDKconfig/toolchains可配置相应的编译工具链,以及选择平台
二、SDK 各模块介绍
| 模块名 | 所在目录 | 功能 |
|---|---|---|
| mqtt_packet | common/mqtt_packet | 通用组件,实现MQTT控制包的序列化和反序列化 |
| utils | common/utils | 通用组件,实现列表、日志等通用操作 |
| cryptology | common/cryptology | 通用组件,实现SDK所需密码学算法 |
| mqtt_client | common/mqtt_packet | 服务组件,实现MQTT客户端 |
三、快速体验
1. 安装环境
以下以ubuntu为例子,安装cmake和gcc。
apt-get install cmake gcc g++
2. 创建设备
参考设备接入准备创建密钥认证设备,获取设备信息用作连接平台。
- 产品ID
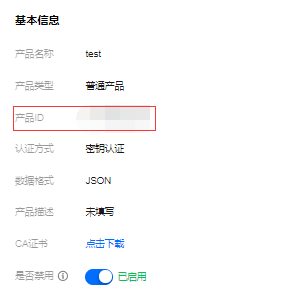
- 设备名和设备密钥
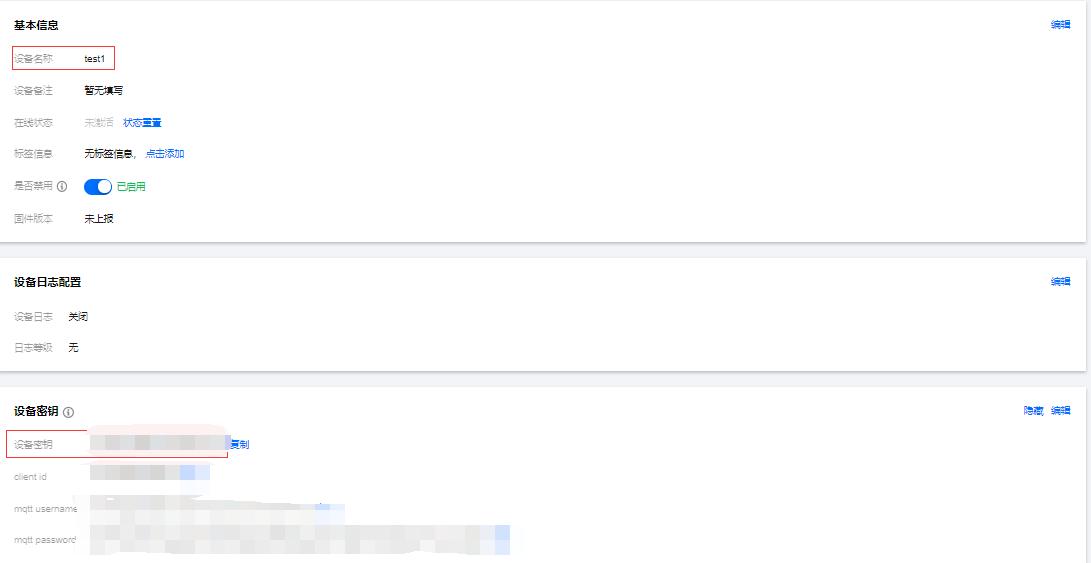
3. 修改设备信息
编辑platform/os/Linux/HAL_Device_linux.c,修改设备信息:
static char sg_product_id[MAX_SIZE_OF_PRODUCT_ID + 1] = "YOUR_PRODUCT_ID";
static char sg_device_name[MAX_SIZE_OF_DEVICE_NAME + 1] = "YOUR_DEVICE_NAME";
static char sg_device_secret[MAX_SIZE_OF_DEVICE_SECRET + 1] = "YOUR_IOT_PSK";
4. 编译运行
运行根目录下./cmake_build.sh进行编译,然后运行./output/bin/mqtt_sample即可快速体验。
四、代码贡献
vscode编辑器请安装以下插件,并配置:
C/C++:支持C语言语法和clang-formatCode Spell Checker:检查单词拼写,以及单词纠正Doxygen Documentation Generator:在settings.json中添加以下内容,以支持doxygen
  "doxdocgen.generic.authorEmail": "fancyxu@tencent.com",
    "doxdocgen.generic.authorName": "fancyxu",
    "doxdocgen.generic.authorTag": "@author {author} ({email})",
    "doxdocgen.file.versionTag": "@version 1.0",
    "doxdocgen.file.copyrightTag": [
        "@copyright",
        "",
        "Tencent is pleased to support the open source community by making IoT Hub available.",
        "Copyright(C) 2018 - {year} THL A29 Limited, a Tencent company.All rights reserved.",
        "",
        "Licensed under the MIT License(the \"License\"); you may not use this file except in",
        "compliance with the License. You may obtain a copy of the License at",
        "http://opensource.org/licenses/MIT",
        "",
        "Unless required by applicable law or agreed to in writing, software distributed under the License is",
        "distributed on an \"AS IS\" basis, WITHOUT WARRANTIES OR CONDITIONS OF ANY KIND,",
        "either express or implied. See the License for the specific language governing permissions and",
        "limitations under the License.",
    ],
    "doxdocgen.file.customTag": [
        "@par Change Log:",
        "<table>",
        "<tr><th>Date       <th>Version <th>Author    <th>Description",
        "<tr><td>{date} <td>1.0     <td>{author}   <td>first commit",
        "</table>",
    ],
    "doxdocgen.file.fileOrder": [
        "copyright",
        "empty",
        "file",
        "brief",
        "author",
        "version",
        "date",
        "empty",
        "custom"
    ]
五、自动化文档生成
1. 安装 doxygen
apt-get install doxygen graphviz
2. 生成 doxygen
doxygen Doxyfile
3. 浏览
打开output/html/index.html,即可浏览项目中的接口和变量信息。
六、单元测试
1. 安装 google test
apt-get install googletest gcovr
cd /usr/src/googletest
mkdir -p build
cd build
cmake .. && make && make install
2. 安装并运行 mosquitto
apt-get install mosquitto
mosquitto -c ./config/mosquitto/mosquitto.conf
3. 打开测试选项
set(CONFIG_IOT_TEST ON)
4. 运行单元测试
./output/bin/iot_sdk_test